
DPU adventures
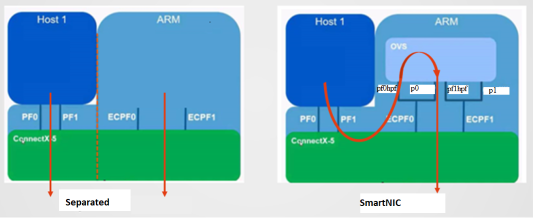
The nVidia (Mellanox) Bluefield-2 DPU was created to solve the problem of doing trusted networking with untrusted workloads in large scale datacenters. With the nVidia Bluefield-2, users get access to a completely isolated (trusted) compute capability that sits in the flow of the traffic (in SmartNIC mode):
The hyperscalers pioneered this kind of functionality: early versions of bump-in-the-wire networking were developed by Microsoft (with their Azure FPGA based traffic shaping solutions), and later AWS introduced Nitro Cards. While the first iterations were designed around FPGAs, later editions of SmartNICs and eventually DPUs were increasingly engineered around dedicated compute (ARM cores) on the cards.
None of the hardware the Azure and AWS developed is available on the market (except some 2nd hand), and Mellanox (acquired by nVidia) jumped into this gap designing products for the rest of us, catering to the same use cases in large scale (private) datacenters:
My personal interest is not in building my own datacenter. Rather, now that the prices of used equipment has come down, I’m exploring these cards for their usefulness as alternatives for e.g. Raspberry Pis in setting up lab environments for Kubernetes etc.
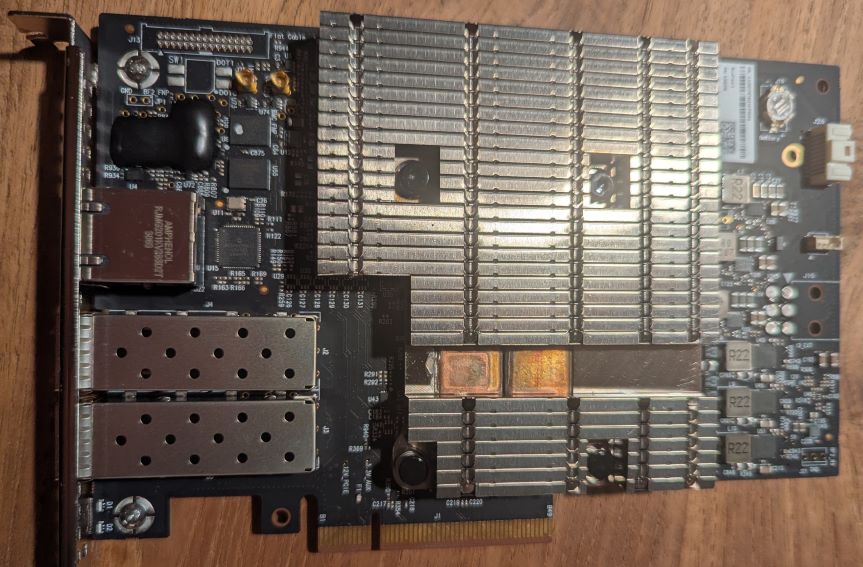
I bought a card for ~$180 and documented my journey below. I’ll start with getting it going all the way to testing the performance and usefulness.
Initial bring up - firmware and ARM core activation
When I first installed this card and plugged the management network, it did not come up. Neither could I access the card through the PCIe based management interface, as it was likely in secure/isolated mode - or even in (Smart)NIC mode (no ARM cores active).
The card was however recognized on the PCIe bus:
$ lspci
01:00.0 Ethernet controller: Mellanox Technologies MT42822 BlueField-2 integrated ConnectX-6 Dx network controller (rev 01)
01:00.1 Ethernet controller: Mellanox Technologies MT42822 BlueField-2 integrated ConnectX-6 Dx network controller (rev 01)
01:00.2 DMA controller: Mellanox Technologies MT42822 BlueField-2 SoC Management Interface (rev 01)
Ideally we want to have access to the management interface and ConnectX-6 firmware. To do this we need to install the required supporting DOCA software on the host.
After a restart of the mst service, we should have some new devices under /dev/mst/
$ mst restart
Stopping MST (Mellanox Software Tools) driver set
Starting MST (Mellanox Software Tools) driver set
Loading MST PCI module - Success
Loading MST PCI configuration module - Success
Create devices
Unloading MST PCI module (unused) - Success

$ ls -lrt /dev/mst
total 0
crw------- 1 root root 507, 0 apr  1 21:21 mt41686_pciconf0
crw------- 1 root root 507, 1 apr  1 21:21 mt41686_pciconf0.1
Let’s query the main one for firmware data:
$ flint -d /dev/mst/mt41686_pciconf0 query
Image type:            FS4
FW Version:            24.36.7506
FW Release Date:       9.8.2023
Product Version:       24.36.7506
Rom Info:              type=UEFI Virtio net version=21.4.10 cpu=AMD64,AARCH64
                       type=UEFI Virtio blk version=22.4.10 cpu=AMD64,AARCH64
                       type=UEFI version=14.31.10 cpu=AMD64,AARCH64
                       type=PXE version=3.7.200 cpu=AMD64
Description:           UID                GuidsNumber
Base GUID:             58a2e1030095155a        16
Base MAC:              58a2e195155a            16
Image VSD:             N/A
Device VSD:            N/A
PSID:                  DEL0000000033
Security Attributes:   secure-fw
Mine is already patched to the latest version, one thing to note is the PSID is DEL000000033 which confirms this is a Dell OEM version of the card. The nVidia version would be MT_0000000765 with Legacy OPN MBF2H532C-AECOT and nVidia SKU 900-9D218-0083-ST4.
The first thing to check next is to make sure the DPU is in DPU mode, meaning the ARM cores are enabled and the Bluefield-2 is not just a glorified 2 port NIC without intelligence:
$ mlxconfig -d /dev/mst/mt41686_pciconf0 q INTERNAL_CPU_OFFLOAD_ENGINE
Device #1:
----------

Device type:        BlueField2
Name:               0JNDCM_Dx
Description:        NVIDIA Bluefield-2 Dual Port 25 GbE SFP Crypto DPU
Device:             /dev/mst/mt41686_pciconf0

Configurations:                                          Next Boot
        INTERNAL_CPU_OFFLOAD_ENGINE                 ENABLED(0)
If the line above does not say ENABLED(0), issue this command (or change this setting in the UEFI later, see below):
$ mlxconfig -d /dev/mst/mt41686_pciconf0 s INTERNAL_CPU_MODEL=1 INTERNAL_CPU_PAGE_SUPPLIER=0 INTERNAL_CPU_ESWITCH_MANAGER=0 INTERNAL_CPU_IB_VPORT0=0 INTERNAL_CPU_OFFLOAD_ENGINE=0
Next, reboot and query the device again to make sure it stuck.
UEFI and OS installation
Management of the card is done through any of the orange connections in this image:
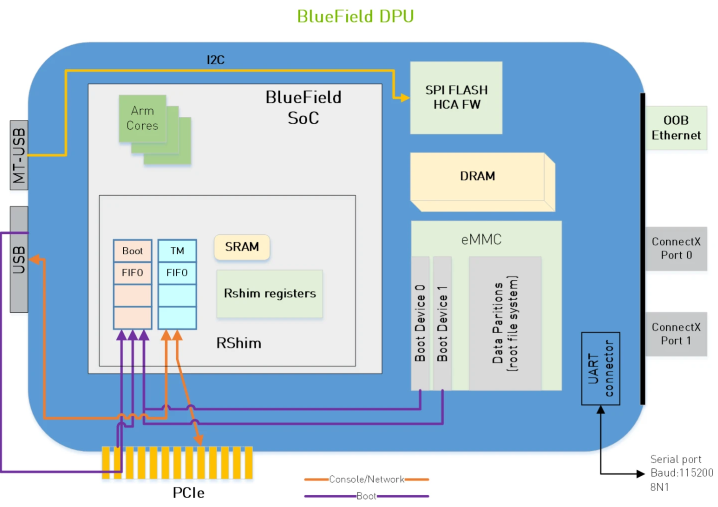 USB requires a special cable (or access to the on-board BMC) so the path of least resistance is to use PCIe.
We should be able to access the card over a virtual Ethernet interface called tmfifo_net0 which is layered on top of PCIe and exposed by the rshim driver:
USB requires a special cable (or access to the on-board BMC) so the path of least resistance is to use PCIe.
We should be able to access the card over a virtual Ethernet interface called tmfifo_net0 which is layered on top of PCIe and exposed by the rshim driver:
$ ip link
5: tmfifo_net0: <BROADCAST,MULTICAST,UP,LOWER_UP> mtu 1500 qdisc fq_codel state UNKNOWN mode DEFAULT group default qlen 1000
    link/ether 00:1a:ca:ff:ff:02 brd ff:ff:ff:ff:ff:ff
A virtual console is in turn implemented on top of this interface:
$ screen /dev/rshim0/console 115200
If this doesn’t work right away, reset the rshim driver (on the host):
$ systemctl stop rshim
$ systemctl disable rshim
$ systemctl enable rshim
$ systemctl start rshim
Since I still wasn’t able to log in with the default password, I decided to reset the whole software stack by loading a new UEFI firmware + OS (which would also reset the various passwords):
$ bfb-install --bfb bf-bundle-2.10.0-147_25.01_ubuntu-22.04_prod.bfb --rshim rshim0
If you keep the rshim console open in another window, you should be able to follow the installation. Note that there are multiple bundles: the ones starting with bf-bundle update both the UEFI as well as the whole OS disk, the ones starting with bf-fwbundle update just the UEFI.
After all is done, reset the DPU with:
$ sudo su -
$ echo "SW_RESET 1" > /dev/rshim0/misc
UEFI settings and OS config
Booting took forever for me here as Redfish was waiting for a DHCP IP, and I could not get the OOB management NIC to work. After jumping into the UEFI (password bluefield), it seemed a few settings were still optimized for installation in a Dell iDRAC managed environment. What you have to change to get it working:
- disable Vendor Field mode - as this mode locks out the OOB port
- disable Redfish - as it’s hijacking the OOB port for its own purposes
- enable SMMU
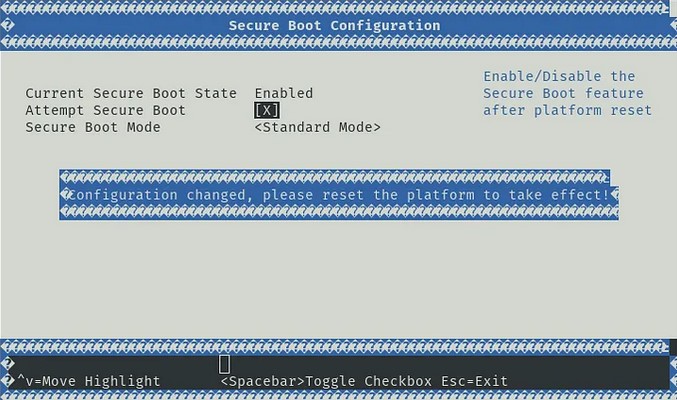
- disable Secure boot:
- set Internal CPU Model to ‘Embedded’ - if you didn’t do so already above:

Now on restart, I could finally log in to the DPU OS with ubuntu/ubuntu through the console:
$ ip link
2: oob_net0: <BROADCAST,MULTICAST,UP,LOWER_UP> mtu 1500 qdisc fq_codel state UP mode DEFAULT group default qlen 1000
    link/ether 58:a2:e1:95:15:68 brd ff:ff:ff:ff:ff:ff
    altname enamlnxbf17i0
3: tmfifo_net0: <BROADCAST,MULTICAST,UP,LOWER_UP> mtu 1500 qdisc fq_codel state UP mode DEFAULT group default qlen 1000
    link/ether 00:1a:ca:ff:ff:01 brd ff:ff:ff:ff:ff:ff
4: p0: <NO-CARRIER,BROADCAST,MULTICAST,UP> mtu 1500 qdisc mq state DOWN mode DEFAULT group default qlen 1000
    link/ether 58:a2:e1:95:15:60 brd ff:ff:ff:ff:ff:ff
    altname enp3s0f0np0
5: p1: <NO-CARRIER,BROADCAST,MULTICAST,UP> mtu 1500 qdisc mq state DOWN mode DEFAULT group default qlen 1000
    link/ether 58:a2:e1:95:15:61 brd ff:ff:ff:ff:ff:ff
    altname enp3s0f1np1
Note the oob_net0 (out of band management), tmfifo_net0 (PCIe networking to host) and the p0/p1 SFP56 ports.
While the oob_net0 comes online and gets a DHCP IP address on my LAN, SSH and internet was still not working. This is because return packages still flow across the tmfifo_net0 interface. Change the priority metric to prioritize oob_net0 by editing /etc/netplan/50-cloud-init.yaml to:
network:
    ethernets:
        oob_net0:
            dhcp4: true
            routes:
            -   metric: <something lower than 1025>
                to: 0.0.0.0/0
                via: <lan gateway>
        tmfifo_net0:
            addresses:
            - 192.168.100.2/30
            dhcp4: false
            nameservers:
                addresses:
                - 192.168.100.1
            routes:
            -   metric: 1025
                to: 0.0.0.0/0
                via: 192.168.100.1
    renderer: NetworkManager
    version: 2
and apply the network configuration:
$ netplan apply
For further network config, including an overview of Separated vs. ECPF mode see this blog.
Optional: BMC access
Access to the BMC can be useful if you don’t want to depend on managing the DPU through PCIe. It allows you to update firmware, recover access, etc, through the RJ45. The BMC access is password protected, and likely non-default when you receive it 2nd hand. To factory reset the BMC, issue the following command from the ARM:
$ ipmitool mc reset cold
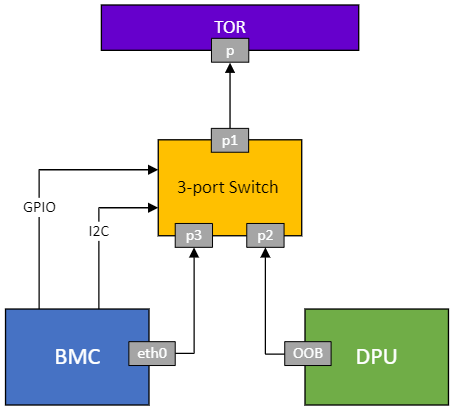
After reset, you should be able to login through the default root/0penBmc - accessible by SSH either through the LAN, or through the internal network from the ARM side. To understand the management network situation: there is an internal switch behind the RJ45 management port, connecting the BMC and ARM cores:
For more info, you can get the BMC firmware version from the ARM side command:
$ ipmitool mc info
Device ID                 : 1
Device Revision           : 1
Firmware Revision         : 23.04
IPMI Version              : 2.0
Manufacturer ID           : 33049
Manufacturer Name         : Unknown (0x8119)
Product ID                : 2 (0x0002)
Product Name              : Unknown (0x2)
Device Available          : yes
Provides Device SDRs      : yes
Additional Device Support :
    Sensor Device
    SDR Repository Device
    SEL Device
    FRU Inventory Device
    IPMB Event Receiver
    Chassis Device
Aux Firmware Rev Info     :
    0x10
    0x03
    0x00
    0x00
In this case the firmware version is 23.04-3
On-board CPU and PCIe
The CPU reported by the OS:
$ lscpu
Architecture:             aarch64
  CPU op-mode(s):         32-bit, 64-bit
  Byte Order:             Little Endian
CPU(s):                   8
  On-line CPU(s) list:    0-7
Vendor ID:                ARM
  Model name:             Cortex-A72
    Model:                0
    Thread(s) per core:   1
    Core(s) per socket:   8
    Socket(s):            1
    Stepping:             r1p0
    BogoMIPS:             400.00
    Flags:                fp asimd evtstrm aes pmull sha1 sha2 crc32 cpuid
Caches (sum of all):
  L1d:                    256 KiB (8 instances)
  L1i:                    384 KiB (8 instances)
  L2:                     4 MiB (4 instances)
  L3:                     6 MiB (1 instance)
The PCIe devices visible to the ARM cores:
$ lspci
00:00.0 PCI bridge: Mellanox Technologies MT42822 BlueField-2 SoC Crypto enabled (rev 01)
01:00.0 PCI bridge: Mellanox Technologies MT42822 Family [BlueField-2 SoC PCIe Bridge] (rev 01)
02:00.0 PCI bridge: Mellanox Technologies MT42822 Family [BlueField-2 SoC PCIe Bridge] (rev 01)
03:00.0 Ethernet controller: Mellanox Technologies MT42822 BlueField-2 integrated ConnectX-6 Dx network controller (rev 01)
03:00.1 Ethernet controller: Mellanox Technologies MT42822 BlueField-2 integrated ConnectX-6 Dx network controller (rev 01)
03:00.2 Ethernet controller: Mellanox Technologies MT42822 BlueField-2 integrated ConnectX-6 Dx network controller (rev 01)
This was a bit of a disappointment, as my hope was that the PCIe switch could do transparent bridging, or at least take ownership or expose select devices on the host. This would enable direct access from the ARM cores to e.g. NVMe drives on the host.
Useful tweaks
If you want to reset the whole config to defaults, you can reset the firmware config with:
$ mlxconfig -d /dev/mst/mt41686_pciconf0 -y reset
Disabling PXE boot helps for faster starts:
$ mlxconfig -d /dev/mst/mt41686_pciconf0 s EXP_ROM_PXE_ENABLE=0
Network port P2 mystery: I also kept getting messages on a 3rd port (p2) - which is not physically there. Changing the fw config to 2 physical ports should help:
$ mlxconfig -d /dev/mst/mt41686_pciconf0 s NUM_OF_PF=2
Still, the PCIe enumeration reports 3 interfaces as above, and ip link keeps showing the 3rd port as well. After much digging this seems to be a virtual port directly from the ARM cores to the BMC. You can disable it with mlxconfig -d /dev/mst/mt41686_pciconf0 s MANAGEMENT_PF_MODE=2.
Cross flashing to Mellanox firmware
Now for the big one. I wanted to change the firmware to mainline Mellanox, to prevent having to use some OEM (Dell) patching software, and to make sure I got the latest - vanilla - firmware.
In the past, cross flashing stock firmware on OEM Mellanox devices wasn’t considered a heavy lift. It seems this changed a bit in the latest years. From searching Reddit and forums, there seems to be no way to crossflash “secure-fw” ConnectX-6 and above cards through software alone.
The first clue that got me going was forcing the DPU into flash recovery mode. The way to do this, is by tricking the hardware into thinking no firmware/flash is present, so it can be flashed from so called ’livefish’ mode.
You can do this by shorting 2 pins on the physical card, specifically BF2_FNP (‘firmware not present’) to GND in the top left corner of the card close to the bracket:
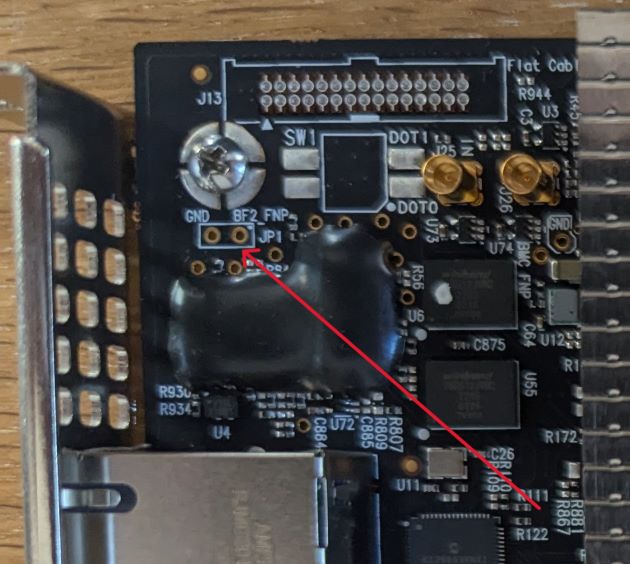
There could have been a header here to put a jumper across. Alas it was unpopulated, so I did some soldering:
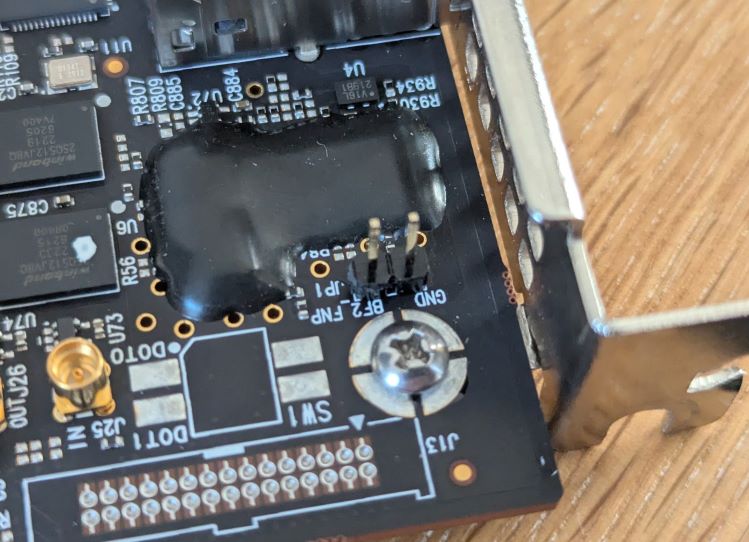
You could also use something like a pair of tweezers to short the pins, but this seemed more reliable and less prone to accidental shorts to me.
As you start the DPU with the short in place, you now get:
$ lspci
01:00.0 Memory controller: Mellanox Technologies MT42822 Family [BlueField-2 SoC Flash Recovery] (rev 01)
Query the firmware chip:
$ mstflint --device 01:00.0 -ocr hw query

-W- Firmware flash cache access is enabled. Running in this mode may cause the firmware to hang.
HW Info:
  HwDevId                 532
  HwRevId                 0x1
Flash Info:
  Type                    MX25Lxxx
  TotalSize               0x2000000
  Banks                   0x1
  SectorSize              0x1000
  WriteBlockSize          0x10
  CmdSet                  0x80
  QuadEn                  1
  Flash0.WriteProtected   Top,1-Sectors
  JEDEC_ID                0x1920c2
  TBS, BP[3:0]            0, 0001
Disable write protection with the OEM version of flint (the one packaged with DOCA does not work), and check the chip again:
$ flint --device 01:00.0 -ocr hw set Flash0.WriteProtected=Disabled

-W- Firmware flash cache access is enabled. Running in this mode may cause the firmware to hang.
-I- Flash0 parameter was set successfully

$ mstflint --device 01:00.0 -ocr hw query

-W- Firmware flash cache access is enabled. Running in this mode may cause the firmware to hang.
HW Info:
  HwDevId                 532
  HwRevId                 0x1
Flash Info:
  Type                    MX25Lxxx
  TotalSize               0x2000000
  Banks                   0x1
  SectorSize              0x1000
  WriteBlockSize          0x10
  CmdSet                  0x80
  QuadEn                  1
  Flash0.WriteProtected   Disabled
  JEDEC_ID                0x1920c2
  TBS, BP[3:0]            0, 0000
Write the firmware of the last Mellanox version (24.35.4506) that was explicit for one PSID (remember ours is MT_0000000765), so it picks up the PSID automatically:
$ flint -d 01:00.0 -nofs --use_image_ps --ignore_dev_data --allow_psid_change -i fw-BlueField-2-rel-24_35_4506-MBF2H532C-AECO_Ax-NVME-20.4.1-UEFI-21.4.10-UEFI-22.4.10-UEFI-14.29.15-FlexBoot-3.6.902.signed.bin -ocr burn

-W- Firmware flash cache access is enabled. Running in this mode may cause the firmware to hang.
Done.
    Current FW version on flash:  24.36.7506
    New FW version:               24.35.4506

    Note: The new FW version is older than the current FW version on flash.

 Do you want to continue ? (y/n) [n] : y


    You are about to replace current PSID on flash - "DEL0000000033" with a different PSID - "MT_0000000765".
    Note: It is highly recommended not to change the PSID.

 Do you want to continue ? (y/n) [n] : y
Burn process will not be failsafe. No checks will be performed.
ALL flash, including the device data sections will be overwritten.
If this process fails, computer may remain in an inoperable state.

 Do you want to continue ? (y/n) [n] : y
Burning FW image without signatures - OK
Burning FW image without signatures - OK
Restoring signature                     - OK
-I- To load new FW run reboot machine.
You can optionally enable write protection on the flash before powercycling the host.
Shut down the machine, remove the jumper, and after restart you’ll find the PSID was reset:
$ flint --device 01:00.0 q
Image type:            FS4
FW Version:            24.35.4506
FW Release Date:       22.12.2024
Product Version:       24.35.4506
Rom Info:              type=UEFI Virtio net version=21.4.10 cpu=AMD64,AARCH64
                       type=UEFI Virtio blk version=22.4.10 cpu=AMD64,AARCH64
                       type=UEFI version=14.29.15 cpu=AMD64,AARCH64
                       type=PXE version=3.6.902 cpu=AMD64
Description:           UID                GuidsNumber
Base GUID:             N/A                     16
Base MAC:              N/A                     16
Image VSD:             N/A
Device VSD:            N/A
PSID:                  MT_0000000765
Security Attributes:   secure-fw
Since the Base GUID and MAC were reset, we have to set those back to the ones we had before:
$ flint --device 01:00.0 -guid 0x58a2e1030095155a -mac 0x58a2e195155a sg
-I- To load new configuration run mlxfwreset or reboot machine

$ mlxfwreset --device 01:00.0 reset

The reset level for device, 01:00.0 is:

3: Driver restart and PCI reset
Please be aware that resetting the Bluefield may take several minutes. Exiting the process in the middle of the waiting period will not halt the reset.
The ARM side will shut down.
Continue with reset?[y/N] y
-I- Sending Reset Command To Fw             -Done
-E- The PCI link is still down even after the expected time (2.0) seconds has passed. Exiting the process.

$ flint --device 01:00.0 q
Image type:            FS4
FW Version:            24.35.4506
FW Release Date:       22.12.2024
Product Version:       24.35.4506
Rom Info:              type=UEFI Virtio net version=21.4.10 cpu=AMD64,AARCH64
                       type=UEFI Virtio blk version=22.4.10 cpu=AMD64,AARCH64
                       type=UEFI version=14.29.15 cpu=AMD64,AARCH64
                       type=PXE version=3.6.902 cpu=AMD64
Description:           UID                GuidsNumber
Base GUID:             58a2e1030095155a        16
Orig Base GUID:        N/A                     16
Base MAC:              58a2e195155a            16
Orig Base MAC:         N/A                     16
Image VSD:             N/A
Device VSD:            N/A
PSID:                  MT_0000000765
Security Attributes:   secure-fw
Power down and reset the system. From here we can flash any Mellanox OEM firmware we like.
Geekbench
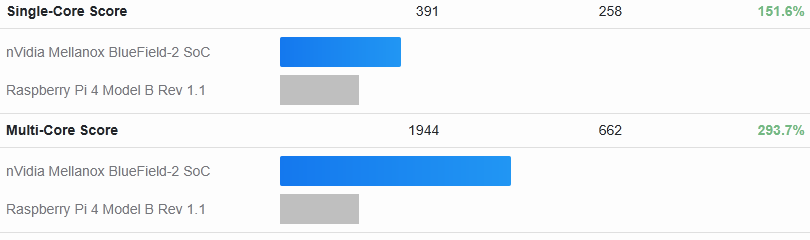
I picked Geekbench for a quick benchmark as it has a convenient preview for AARCH64.
Testing the card against a Raspberry Pi 4, reveals this is no contest. While the Bluefield-2 is is ~50% faster in single-core, it’s 3x as fast in Multi-core as it has double the cores:
The Pi 5 comparison is a bit more nuanced: here the Bluefield-2 can keep up in Multi-core performance, but is much slower than the Pi 5 as the latter has an updated architecture (Cortex A76):

The Bluefield-3 is likely to leapfrog the Pi 5 again as it comes with 16 Cortex A78 cores. However, that card is still recent and not available on the 2nd hand market.
Summary
I definitely had some fun reverse engineering this enterprise product. As for the usefulness?
The good:
- a Raspberry Pi 4 type CPU (ARM Cortex A-72) on steroids: 2x the cores at 2.5 GHz (vs. 1.5) making it 3x faster in Multi-Core workloads
- 32 GB of ECC DDR4 (vs. max 8 on Pi 4 and 16 on Pi 5)
- serious networking with 2x 25G/10G/1G network ports
- dedicated (Out of Band) management
- convenient to install in a server (PCIe Gen 4.0 x8)
The not so great:
- can’t beat a Raspberry Pi 5 on compute
- power consumption
- takes a PCIe port - unless you power it outside of the server
- no bus mastering capability (for direct access to other host PCIe devices - like NVMe drives)
What’s next?
Building a K8s cluster out of these devices could be fun but would be rather pointless. A cluster of Pi 5’s would be faster and more power efficient.
I’ll rather keep it around to experiment with providing NVMe-oF services from my storage box to my future converged CPU host. nVidia SNAP is an option, although that seems to require an expensive license.